We’ve all seen static images on websites. They’re nice, but what if your images could be more than decoration? What if they could invite your visitors to play! Like click, reveal, solve little challenges, and interact like a mini-game?
That’s exactly what I’ve been experimenting with on my portfolio: using JavaScript to make images interactive. In this post, I’ll share how you can do it too.
Why Make Images Interactive?
- Engagement: People spend more time on your site if they’re exploring and clicking.
- Memorability: Interactive moments stand out more than static text.
- Fun: A playful “find the object” or “squash the bug” adds delight to a developer portfolio, blog, or landing page.
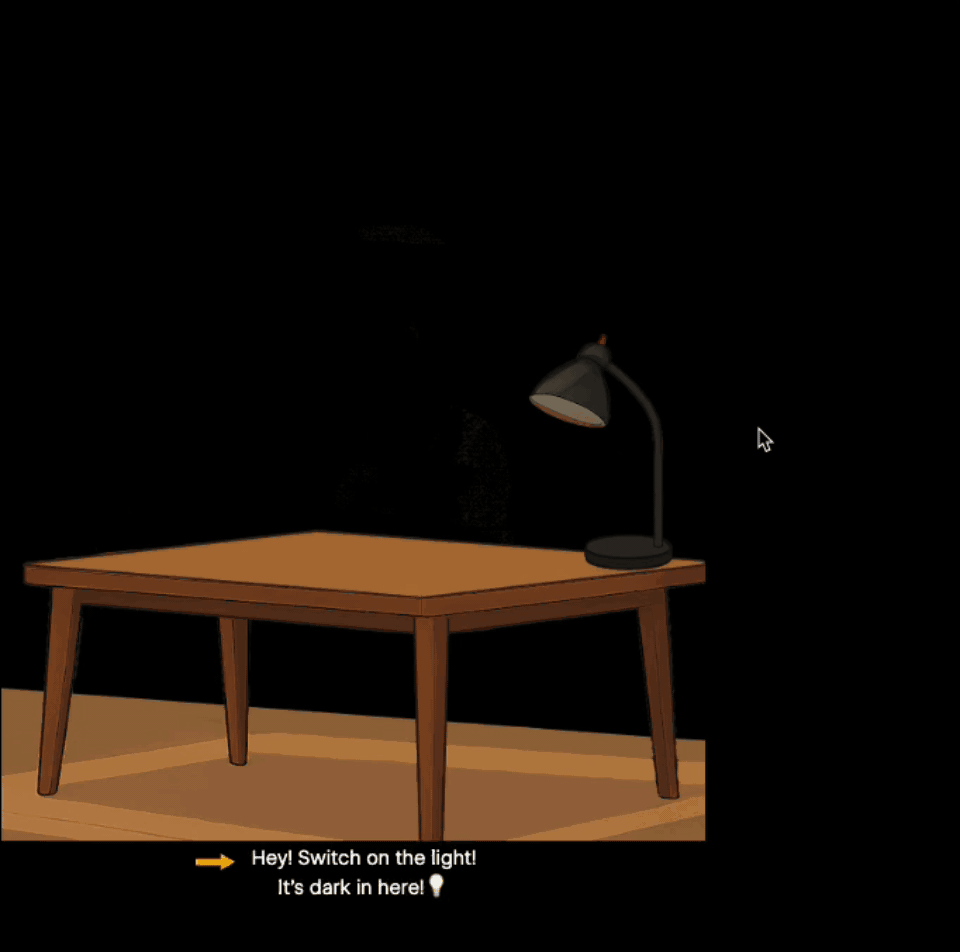
Example: Turning a Lamp into a Clickable Switch
Imagine you have an illustration of a desk with a lamp. Normally, it’s just… a lamp. But with a little JavaScript, you can let users click the lamp to turn the light on.
Here’s a simple setup of the CSS, HTML, and JS:
<style>
  .light-glow {
      display: block;
      position: absolute;
      top: 24%;
      left: 68%;
      width: 350px;
      height: 350px;
      background-image: radial-gradient(circle at center, rgba(228, 206, 168, 0.8) 0%, rgba(255, 254, 253, 0) 85%);
      filter: blur(90px);
      z-index: -1;
      transition: opacity 0.3s ease;
      opacity: 0;
  }
  .light-glow.glow-visible {
      opacity: 1;
  }
</style>

<div id="light-glow"></div>
<img src="lamp-off.png" id="lamp" alt="Lamp" />

<script>
    const lamp = document.getElementById("lamp");
    const glow = document.getElementById("light-glow");
    let isOn = false;

    lamp.addEventListener("click", () => {
        isOn = !isOn;
        lamp.src = isOn ? "lamp-on.png" : "lamp-off.png";
        if (isOn) {
            glow.classList.add("glow-visible");
        } else {
            glow.classList.remove("glow-visible");
        }
    });
</script>When the lamp is clicked on, the Lamp image src is swapped with another image of the Lamp with the light on, and it displays a radial-gradient “glow” behind the lamp, giving the illusion of a lamp turning on and off.
Here’s what I’m talking about:
You can checkout this example on CodePen here: https://codepen.io/melliatto/pen/JoGEMbY
Adding a Challenge
Now, let’s take it further. What if there’s a hidden coffee cup in the picture (it’s blending in with the plant behind it), and it’s only visible when the lamp is on?
<img src="lamp-off.png" id="lamp" alt="Lamp" />
<img src="coffee-cup.png" id="cup" alt="Coffee Cup" style="opacity: 0;" />

<script>
const lamp = document.getElementById("lamp");
const cup = document.getElementById("cup");
let isOn = false;

lamp.addEventListener("click", () => {
  isOn = !isOn;
  lamp.src = isOn ? "lamp-on.png" : "lamp-off.png";
  cup.style.opacity = isOn ? 1 : 0;
});

cup.addEventListener("click", () => {
  alert("You found the coffee cup! ☕ Challenge complete!");
});
</script>Now your users are hunting for the coffee cup! Basically like a hidden object game!

You can see and interact with the above interactive image example in the following CodePen example: https://codepen.io/melliatto/pen/BaNvjgN
You can also find this interactive image as other ones I created on the Dev Portfolio Site here: https://elliottprogrammer.com
Tips for Designing Interactive Images
- Start with layers: Split your illustration into parts (lamp off, lamp on, hidden object, etc.).
- Use CSS for positioning: Stack objects using position: absolute; if needed.
- Give feedback: Use hover effects, sound, or confetti animations to make interactions rewarding.
- Keep it accessible: Add alt attributes and ensure keyboard users can also trigger actions.
Where to Use This
- Portfolio websites (show off creativity & coding skills).
- Blog posts (like this one!).
- Educational content (interactive diagrams).
- Marketing sites (hidden Easter eggs or playful CTAs).
Wrapping Up
Interactive images are a simple but powerful way to bring your website to life. They show personality, they engage your audience, and — if you’re a developer — they double as proof of your skills.
Next time you’re adding an illustration or photo, ask yourself: what if this could be clicked, explored, or discovered?